Some Implementations in Detail
Implementation of a Network Interface Card (NIC)
A NIC can be quite a complex resource. The current implementation discussed here covers only a small subset of what can be done.
Here the picture of what will be deployed:

The implementing covers the following list of requirements:
- assign an existing virtual network’s subnet
- optionally assign a public IP-address (PIP)
- which is already existing
- or has to be created upfront
- optionally assign a Network Security Group (NSG)
- which is already existing
- or has to be created upfront
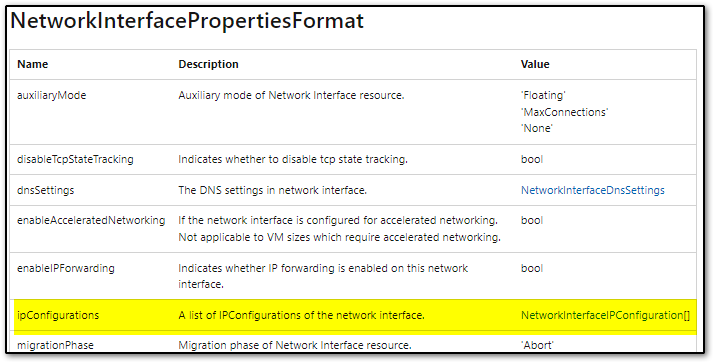
There is one exception to mention here, regarding child resources: according to the plan, IP Configuration resources should have been created by the core module, as IP Configurations are child resource to a NIC:
But according to the documentation, IP Configurations is a read-only resource type that can only used with the Bicep “existing” keyword. Therefore, IP Configurations won’t be a separate parameter but will be part of the NIC properties.
Speaking of parameters, let’s have a look of how to configure a NIC.
NIC Parameters
You will find the complete parameter file in the Repository. I will only point out parts of it here.
...
"parameters": {
  "vnetName": {
    "value": "vnet-az700-01"
  },
  "snetName": {
    "value": "subnet1"
  },
...
These are the names the virtual network and the subnet that the NIC will reference. This assumes the network as already existing. The NIC assembler will never itself create a network. These parameters are used to find the vnet/snet the NIC will reference.
The next parameters describe the public IP address that is to be assigned to the NIC:
...
  "existingPip": {
    "value": false
  },
  "newPip": {
    "value": true
  },
  "pipName": {
    "value": "pip-az700-01"
  },
  "pipSku": {
    "value": {
        "name": "Basic"
    }
  },
  "pipProperties": {
      "value": {
          "publicIPAddressVersion": "IPv4",
          "publicIPAllocationMethod": "Dynamic"
      }
  },
...
existingPip and newPip are boolean parameters that let us decide
on whether we want to assign an exising PIP or one that is to be created by the assembler itself.
Here are the rules:
existingPip= true: assign an existing PIPexistingPip= false: do not assign an existing PIPnewPip= true: create and then assign new PIPnewPip= false: do not create and do not assign a new PIP- if both parameters are set to
falseno PIP will be assigned at all - both parameters set to
trueis a configuration error (which the implementation does not catch as of now)
The next parameters describe the PIP itself:
"pipName": {
  "value": "pip-az700-01"
},
"pipSku": {
  "value": {
      "name": "Basic"
  }
},
"pipProperties": {
    "value": {
        "publicIPAddressVersion": "IPv4",
        "publicIPAllocationMethod": "Dynamic"
    }
},
...
Altogether, this allows us to fulfill all our PIP requirements. We can configure, if we want to assign a Pip at all. If we want one, then we can choose if between a new one to be created or an existing one to be used.
Please note that in the real world you won’t have to specify pipSKU and pipProperties if you want to
assign an existing PIP, which would only require the name.
I included both options here in on parameter file just for demonstration purposes. You can easily switch between the
different scenarios just by setting the switches.
As for the NSG, the parameters follow the same logic as described above.
Finally here is the configuration of the NIC itself:
...
"nicName": {
  "value": "nic-az700-01"
},
"nicProperties": {
  "value": {
    "ipConfigurations": [
      {
        "name": "config01",
        "properties": {
          "privateIPAddressVersion": "IPv4",
          "privateIPAllocationMethod": "Dynamic"
        }
      }
    ],
    "nicType": "Standard"
  }
}
...
Please note that all parameter values, except for the boolean switches needed for the assembler logic, are exact copies taken from the Bicep template documentation. This allows for passing them the core modules without any further ado. And this further allows us to enrich them either by editing the parameter file or by assembler manipulation as described in the next section. The point is that as long as the parameter value is a valid piece of Bicep template, the assembler can pass it down to the core module without a change to the core module’s signature.
NIC Implementation
This section discusses the implementation of the NIC assembler in detail. The code is located in the NIC assembler’s main.bicep file.
The parameter list corresponds to the file discussed above and I will not discuss it again.
The first task is to look up the subnet that we want to assign to the NIC:
...
resource vnet 'Microsoft.Network/virtualNetworks@2022-05-01' existing =  {
  name: vnetName
}

resource snet 'Microsoft.Network/virtualNetworks/subnets@2022-05-01' existing =  {
  name: snetName
  parent: vnet
}
...
This is easy, because it is an unconditional look-up and we only need the respective names of VNET and SNET. Remember that this implementation expects the network to be already existing.
Next we want to either look-up or create a PIP:
...
resource pipExisting 'Microsoft.Network/publicIPAddresses@2022-05-01' existing = if (existingPip) {
  name: pipName
}

module pipNew '../../core/pip/pip.bicep' = if (newPip) {
  name: 'pipCreate'
  params: {
    location: location
    pipName: pipName
    pipSku:  pipSku
    pipProperties: pipProperties
  }
}
...
Because assigning a PIP should be optional (see the requirements above) both the resource look-up and creation are done conditionally. Bicep supports respective syntax.
If the existingPip parameter is set to true we look-up an existing PIP by its name.
If the newPip parameter is set to true, we create a new PIP by calling the PIP’s core module.
Please note that we are already reusing our PIP core module here to create a new public IP address.
If both parameters are set to false, no PIP will be assigned (and you have to do with a private IP).
Remember: setting both switches to true is not allowed and is considered to be a configuration error.
Next, the exact same logic is applied to the assignment of a NSG:
...
// find existing NSG for assignment
resource nsgExisting 'Microsoft.Network/networkSecurityGroups@2022-05-01' existing = if (existingNsg) {
  name: nsgName
}

// create NSG by consuming the NSG Core Module
module nsgNew '../../core/nsg/nsg.bicep' = if (newNsg) {
  name: 'nsgCreate'
  params: {
    location: location
    nsgName: nsgName
    nsgProperties: nsgProperties
    nsgsrSecurityRules: nsgsrSecurityRules
    createRules: createRules
  }
}
...
There is nothing new here.
But now its getting more interesting as the references we just created or looked up have to be injected into the NIC’s property object. Easier said than done in Bicep. I found the union-method to at least offer a solution, even if it is not a niche one. If there are better ways to do it, please let me know.
Let’s start with the ugliest part: inserting a reference into an array element (after that it only gets better). The first task is to inject the subnet-id into NIC’s property object. The template documentation tells us where exactly this id has to be inserted:
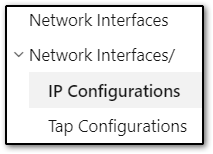
 So ipConfigurations is an array where each element looks like this:
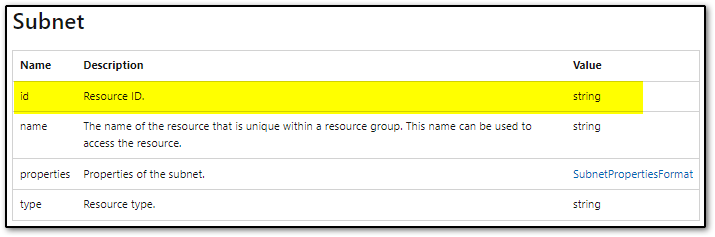
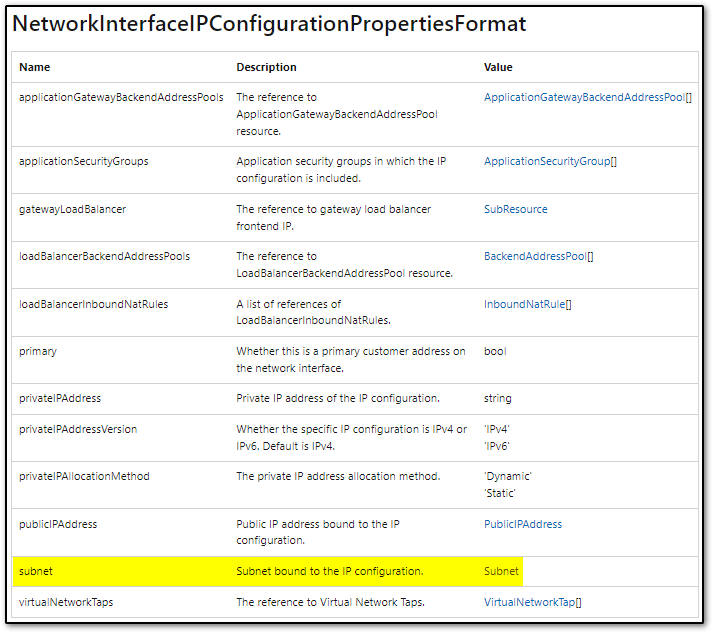 Finally we find the subnet at the end of the list. Just to make sure that inserting an id here is a valid option,
let’s take a look at the subnet properties also:
Finally we find the subnet at the end of the list. Just to make sure that inserting an id here is a valid option,
let’s take a look at the subnet properties also:
Remember that this NIC-assembler currently supports only one ipConfiguration element. So the subnet-id has to be inserted the first (and only) element of the ipConfigurations array. The ipConfigurations array itself is a property of the NIC properties object.
...
// injecting into array elements is a special case
// get first array element for injection
var ipConfigElement         = nicProperties.ipConfigurations[0]
var injectedIpConfigElement0 = union(ipConfigElement, {
  properties: {
    subnet: {
      id: snet.id
    }
  }
})
...
The complication here is that the union-function does not really work well with array elements. It doesn’t merge array elements but simply overwrites them. This is not what we want, because there may and in our case there are already properties defined in this array element.
The solution is to extract the array element from the NIC properties object, inject the subnet-id via the union method and finally merge the new array element back into the NIC properties.
The code above extracts the array element into the variable ipConfigElement and injects the subnet-id, thus
creating the new variable injectedIpConfigElement0.
We don’t merge injectedIpConfigElement0 back into the NIC properties just now,
because there are more injections to be done.
Next step is to optionally inject a PIP into injectedIpConfigElement0:
...
// inject the existing pip if we want that
var injectedIpConfigElement1 = (existingPip) ? union(injectedIpConfigElement0, {
  properties: {
    publicIPAddress: {
      id: pipExisting.id
    }
  }
}) : injectedIpConfigElement0

// inject the new pip if we want that
var injectedIpConfigElement2 = (newPip) ? union(injectedIpConfigElement1, {
  properties: {
    publicIPAddress: {
      id: pipNew.outputs.id
    }
  }
}) : injectedIpConfigElement1
...
We ar building on variable injectedIpConfigElement0 that already contains the subnet and pimp it up some more.
But we have to take into account that the PIP might either be new one or an existing one.
This is handled by combining Bicep’s ternary ? operator with its union() function.
In the end we come up with a new variable injectedIpConfigElement2 which now contains an existing PIP or a
newly created PIP or no PIP at all and thus fulfills all our requirements regarding a PIP.
Please note that fetching the id from newly created PIP, we are relying on the PIP core module to output this id. Every core module outputs name and id of the resource it just created as a principle.
The next step would be to inject an NSG in exactly the same way as the PIP. But as the NSG does not go into
the ipConfigurations array element, the ipConfigurations array is first merged back into NIC’s property object.
...
// merge the array back into the properties
var pipInjected = union(nicProperties, {
  ipConfigurations: [injectedIpConfigElement2]
})
...
At this time we have NIC properties object referencing a VNET/SNET and a PIP respectively. We use this variable to inject an NSG. Again, this reference is optional and the NSG may already be existing or has to be created here. History repeats itself.
...
/ inject existing NSG or do nothing
var nsgInjected1 = (existingNsg) ? union(pipInjected, {
  networkSecurityGroup: {
      id: nsgExisting.id
    }
}) : pipInjected

// conditionally inject newly created NSG
var nsgInjected2 = (newNsg) ? union(nsgInjected1, {
  networkSecurityGroup: {
      id: nsgNew.outputs.id
    }
}) : nsgInjected1
...
Based on the setting of the respective switches, the existing NSG or the newly crated NSG or none at all gets injected.
Now we have a NIC properties object that complies to our requirements. We pass this object as a parameter when consuming the NIC core module.
...
// Finally consuming the NIC Core Module
module nicModule '../../core/nic/nic.bicep' = {
  name: 'nicDeploy'
  params: {
    location: location
    nicName: nicName
    nicProperties: nsgInjected2
  }
}
...